How to Create an Amazing Watercolor Artwork in Photoshop
Create this spring-inspired abstract photo manipulation by Jenny Le! This tutorial will show you how to combine stock photos and splatter brushes together, apply textures, and more.


Step 3
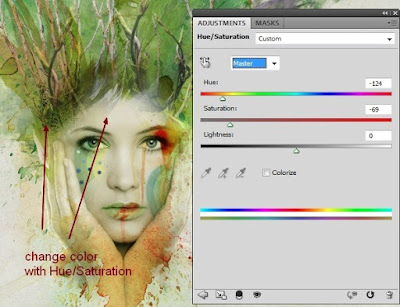
I use an adjustment layer to change color of the picture. Go to Layer-New Adjustment Layer-Hue/Saturation:
Step 4
Extract model and place her at the center section then I use layer mask to remove hard edges and blend her with background:
 Step 5
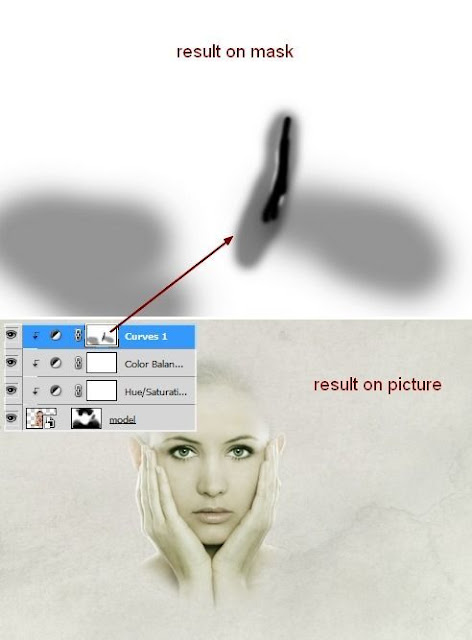
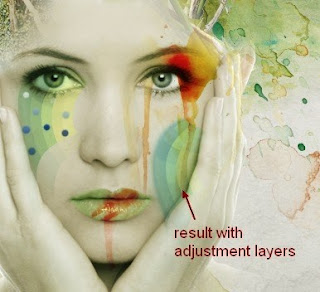
I use some adjustment layers (Hue/Saturation, Color Balance, Curves) with Clipping Mask for model to reduce saturation and brighten her:
 Step 6
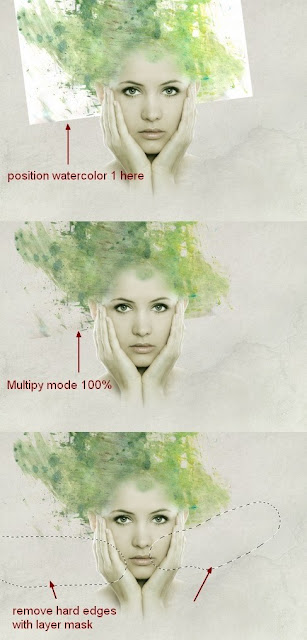
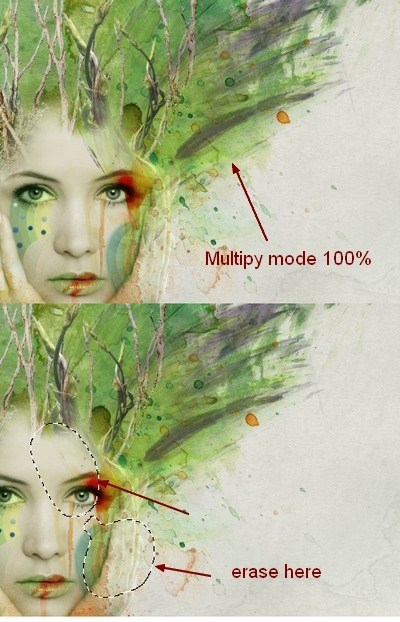
Drag watercolor 1 into top of our picture, place it under model layer. Convert it to Smart Objects and change the mode to Multiply 100% then remove some hard edges with layer mask:
 Step 7
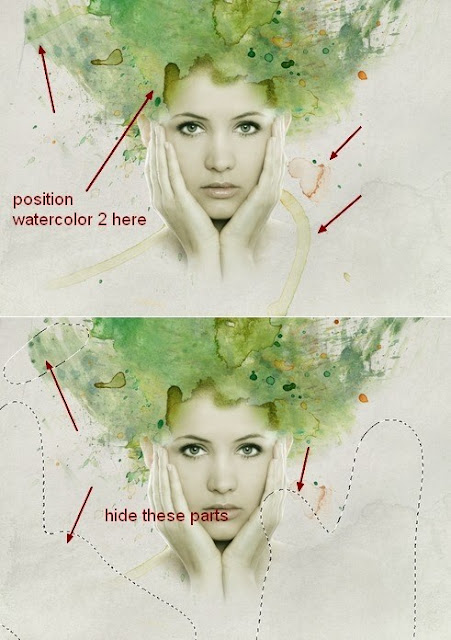
Take watercolor 2 and set it under model layer then clear unwanted parts with layer mask:
Step 9
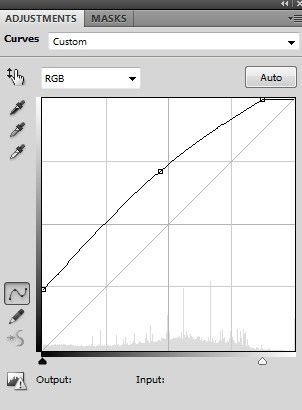
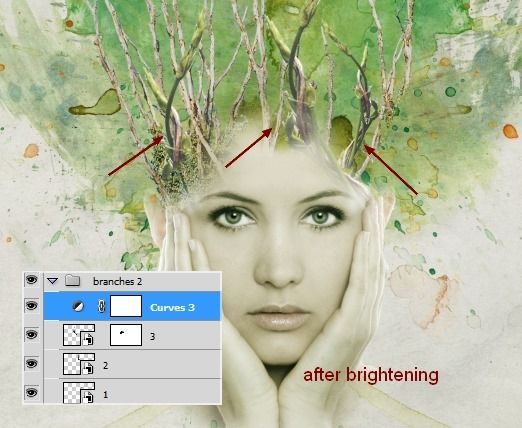
I add a Curves layer (Clipping Mask) to brighten the branches a bit:
Step 10
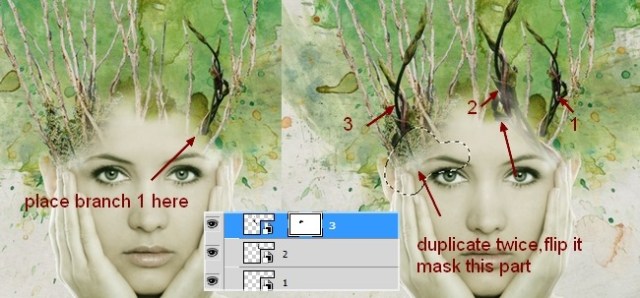
Open branches 2 stock. I take a part from this pic and situate it at the top right of model head, then duplicate it twice, name them from 1 to 3. I flip 2nd horizontally, then position them around model head part. I use layer mask to erase the bottom of the third:
Step 11
These branches look darker from background so I want to brighten them together. To do it, make these layers selected then hit Cmd/Ctrl+G to make group for them. Change the mode of this group from Pass Through (default group mode) to Normal 100%. On 3 layer, go to Layer-New Adjustment Layer-Curves:
 Step 12
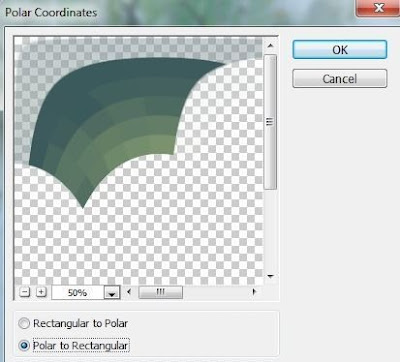
Make a new layer on the top. Set foreground and background to #a8ba81 and #012955. Use Rectangular Marquee Tool to make a square on the pic then go to Filter-Render-Clouds. After applying Clouds filter, choose Filter-Pixelate-Mosaic:

Filter-Distort-Polar Coordinates:
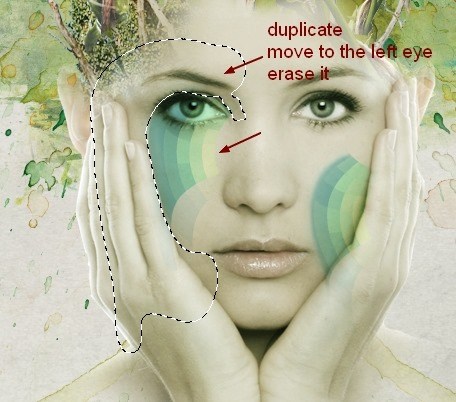
Duplicate this layer and move to left cheek under the eye, hide the left part of it with black brush and layer mask:
 Step 14
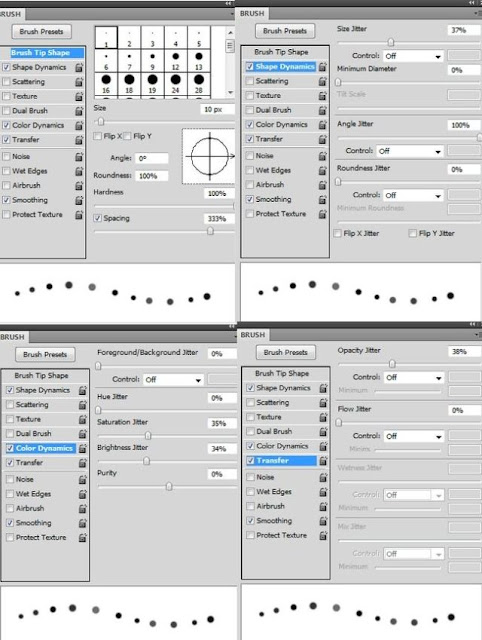
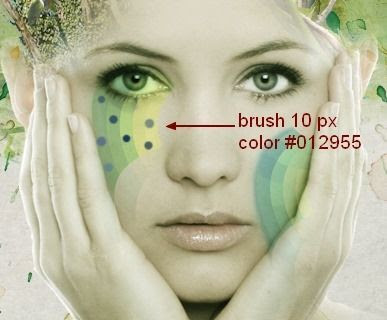
Make a new layer and use hard brush with color #012955 to make some dots under the left eye. Before spotting, press F5 to change settings for this brush:
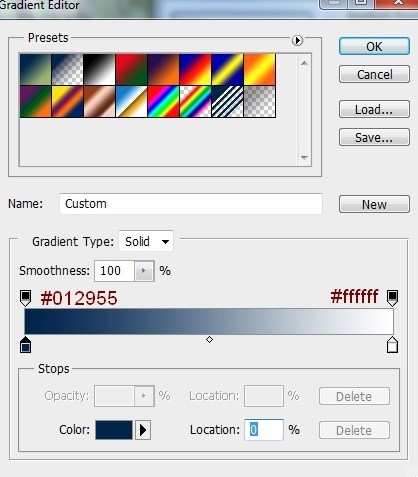
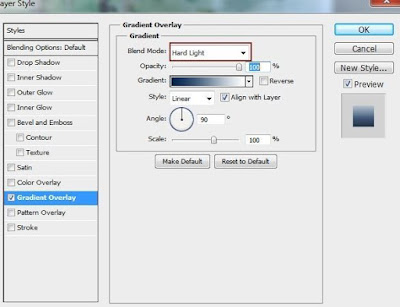
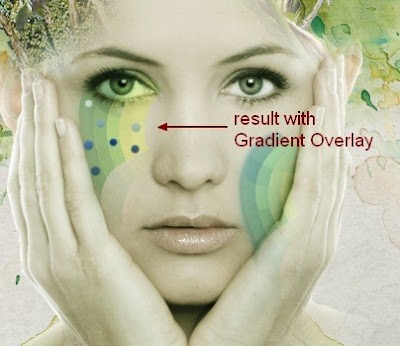
Double click this layer and apply Gradient Overlay for these dots:

Make a new layer and use splatter brush, number 481 to spot on lips and chin, transform it and set the mode to Overlay 100%:
 Step 17
Take watercolor 3 and paste into the right eyes after rotating and resizing. Change the mode to Multiply 100% and use layer mask to get a faded effect:
Step 18
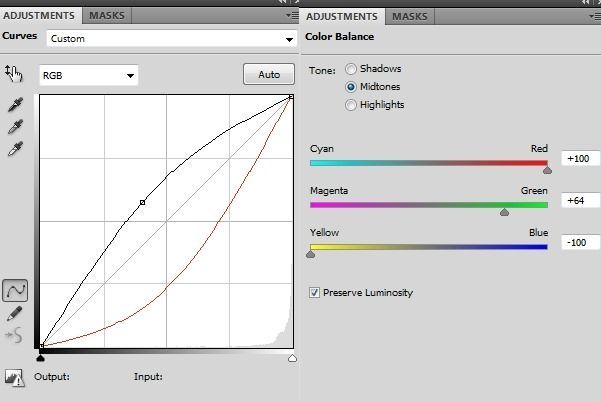
I use Curves and Color Balance layers (Clipping Mask) to change color of this watercolor effect:
 Step 19
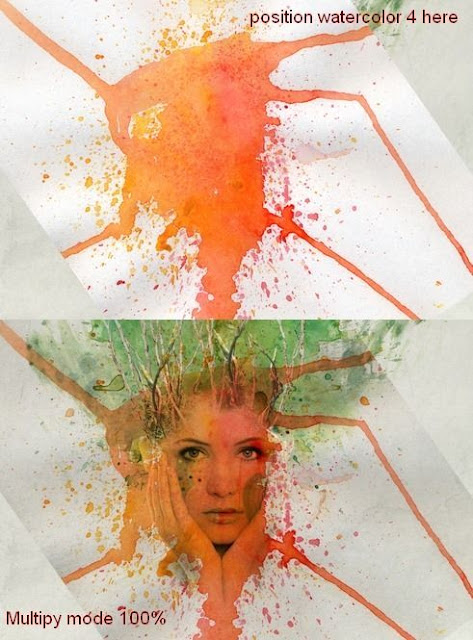
Take watercolor 4 and paste into our picture and change the mode to Multiply 100%.
Right click it, choose Blending Options. Hold the Alt/Option key while dragging white sliding button of This Layer to reduce this effect. Then use layer mask to remove the effect on the face and around model:

 Step 20
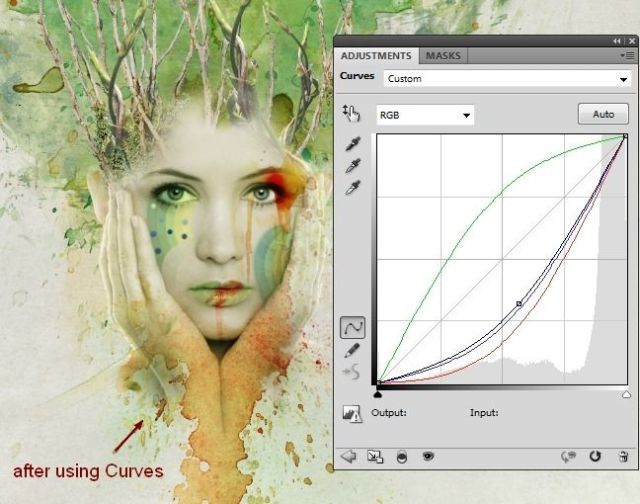
Add a Curves layer to this layer (Clipping Mask):
Step 21
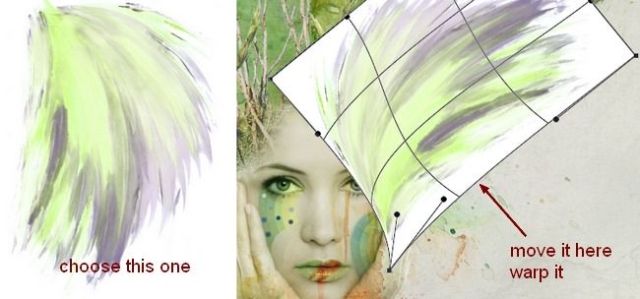
Open watercolor 5 (pack). I choose this one to work with and move it above the top right of model head, warp it:
Change the mode to Multiply 100% and use layer mask to erase the part on model face:
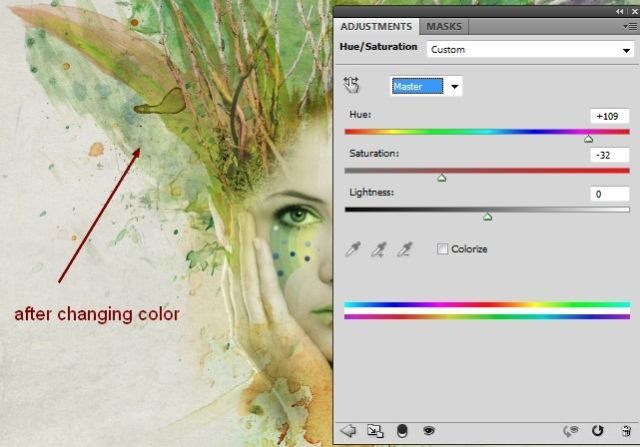
I use a Hue/Saturation layer to change color of this effect:
Step 23
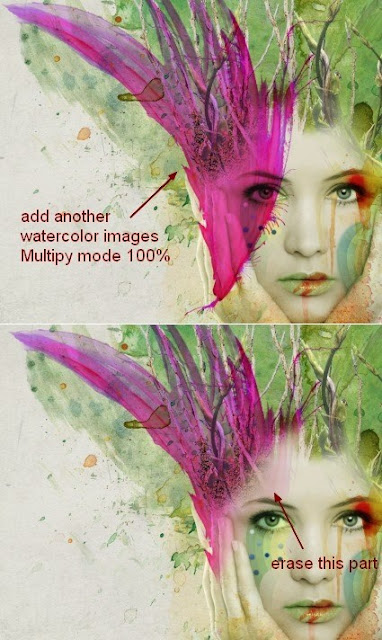
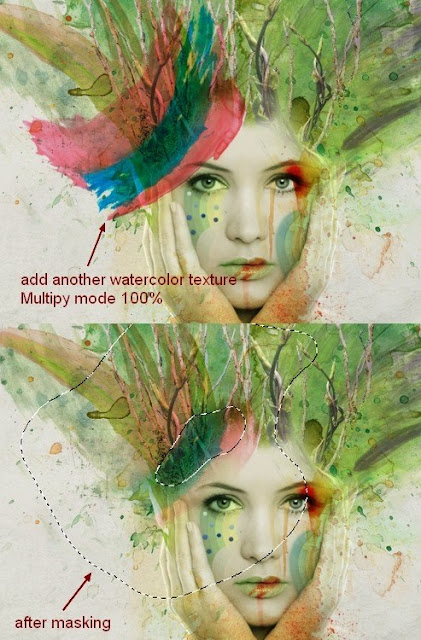
I add another colorful watercolor texture to the left of model head, in a lower position, change the mode to Multiply 100% and hide unwanted parts with layer mask:
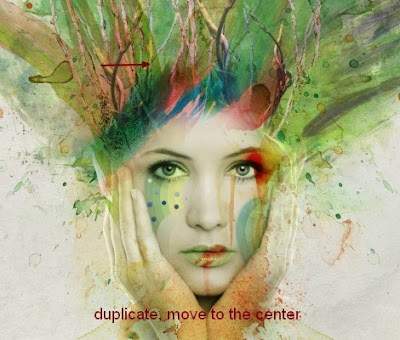
Duplicate this layer and move it to the center of model forehead, use layer mask for it:
Step 24
Make group for this layer as done with branches 2 and change the mode of this group to Multiply 100%. I reduce saturation of them with a Hue/Saturation layer within this group:
Step 25
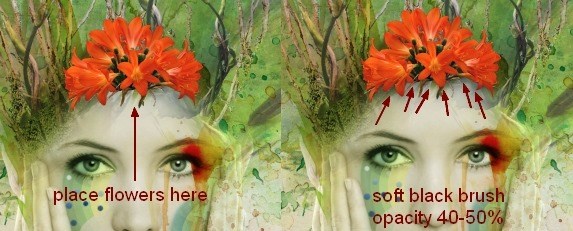
Open flowers stock. Use Move Tool to drag it onto model forehead. Then on a new layer under flowers one I use soft black brush with opacity about 40-50% to paint under flowers to make shadow for them:
Step 26
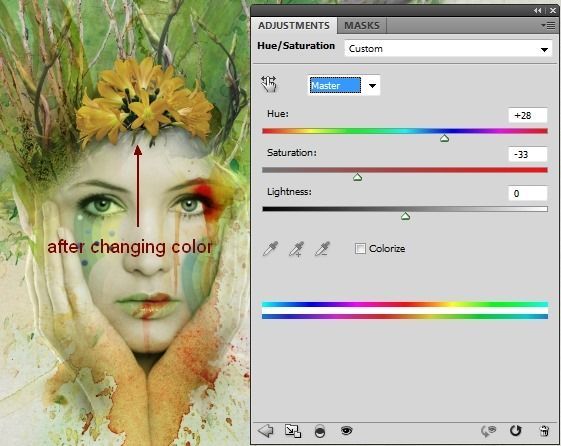
I change color of the flowers with a Hue/Saturation layer:
Step 27
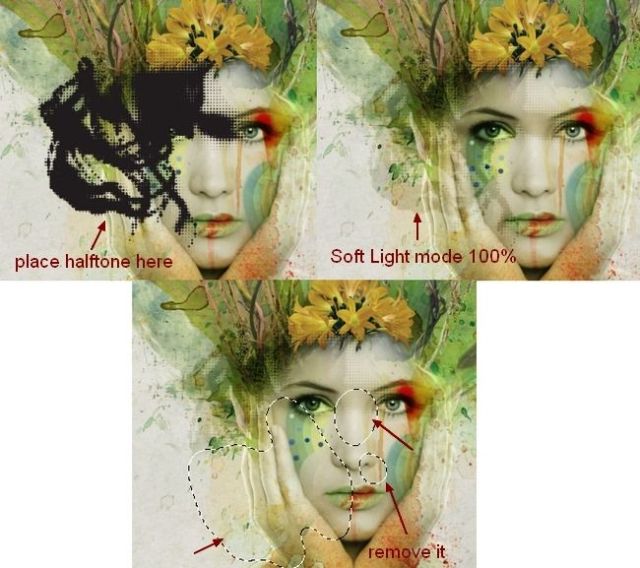
Open halftone images pack. I choose one to position at the left of model head, change the mode to Soft Light 100% and hide some parts with layer mask:
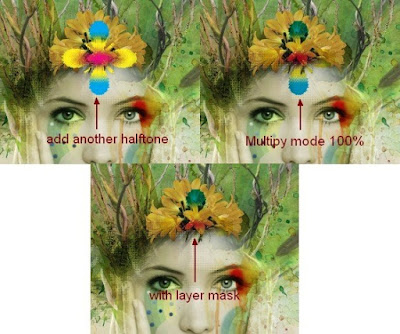
I choose a colorful halftone image to situate at the middle of the flowers. I put the mode to Multiply 100% and erase its bottom:
Step 28
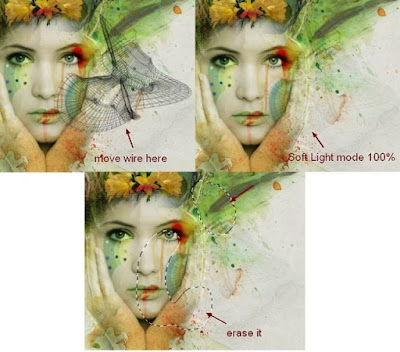
I use one from wire frames pack to put to the right of model head and set the mode to Soft Light 100%:
Step 29
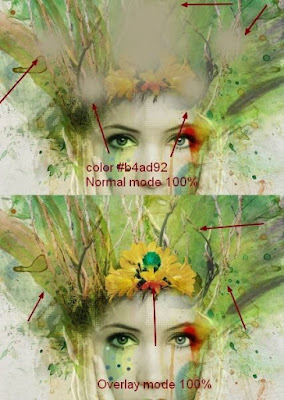
Make a new layer on the top. I use soft brush with color #b4ad92 to brighten the top of model head and blend elements there together. Change the mode to Overlay 100%:
 Step 30
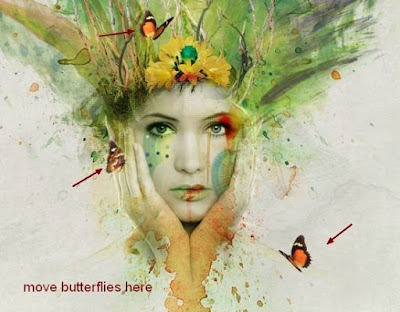
Open butterflies pack. I choose 3 from them to move into our picture, arrange them as shown below:
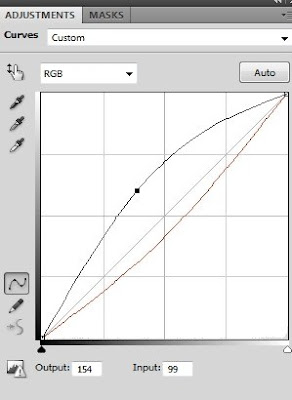
Make group for these butterflies and change the mode of this group to Normal 100%. Create a Curves layer within this group to brighten and alter color of butterflies a little:

Step 31
Create some adjustment layers on the top.
Gradient Map:

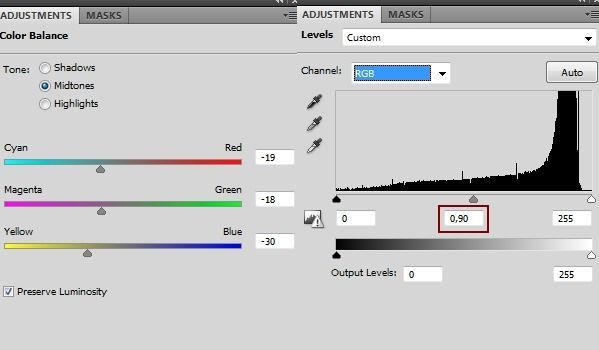
Set this Gradient Map layer to Soft Light mode 100%. Color Balance and Levels:
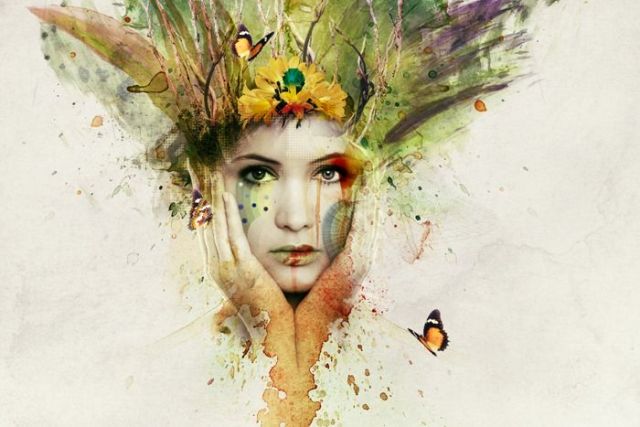
Final Results
Tutorial Resources
Model
Paper 1
Paper 2
Watercolor 1
Watercolor 2
Watercolor 3
Watercolor 4
Watercolor 5
Branches 1
Branches 2
Flowers
Butterflies
Halftone images
Wiresframes
Splatter brushes
Model
Paper 1
Paper 2
Watercolor 1
Watercolor 2
Watercolor 3
Watercolor 4
Watercolor 5
Branches 1
Branches 2
Flowers
Butterflies
Halftone images
Wiresframes
Splatter brushes
Step 1
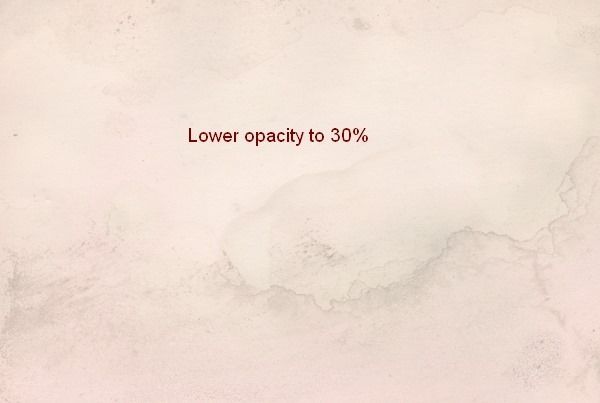
Create a new document and fill it with white. I use the size with 1200×800 but feel free to make your own. Open paper 1 stock, move it into our white canvas then rotate it (choose Edit-Transform-Rotate 90 CCW) . Right click this layer, choose Convert to Smart Objects. Then choose Flip Horizontal:
Create a new document and fill it with white. I use the size with 1200×800 but feel free to make your own. Open paper 1 stock, move it into our white canvas then rotate it (choose Edit-Transform-Rotate 90 CCW) . Right click this layer, choose Convert to Smart Objects. Then choose Flip Horizontal:
Lower opacity to 30%:
Step 2
Open paper 2 stock, use Rectangular Marquee Tool to make a selection on the top left of it and use Move Tool (V) to drag it into our picture and lower opacity to 30%:
Open paper 2 stock, use Rectangular Marquee Tool to make a selection on the top left of it and use Move Tool (V) to drag it into our picture and lower opacity to 30%:
Step 3
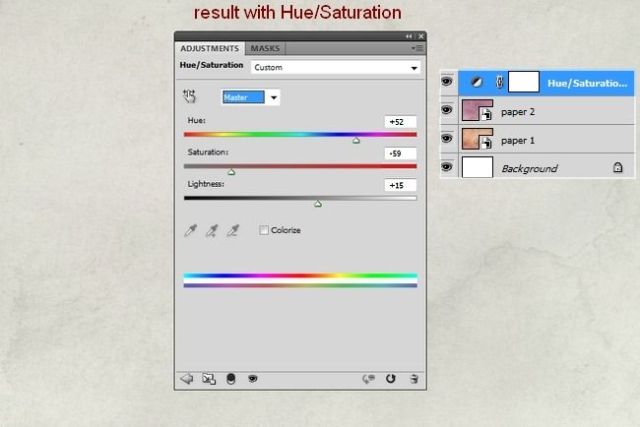
I use an adjustment layer to change color of the picture. Go to Layer-New Adjustment Layer-Hue/Saturation:
Step 4
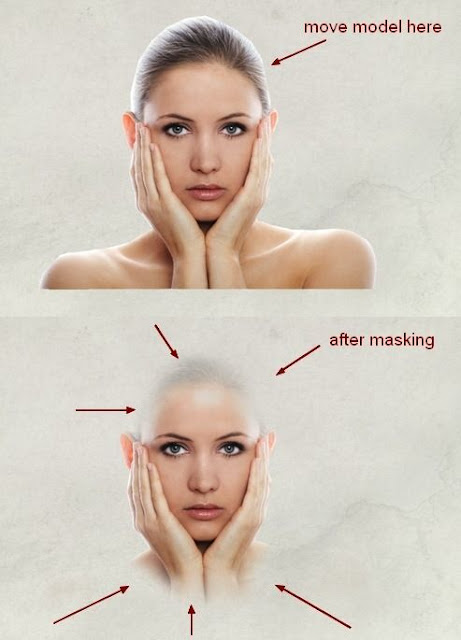
Extract model and place her at the center section then I use layer mask to remove hard edges and blend her with background:
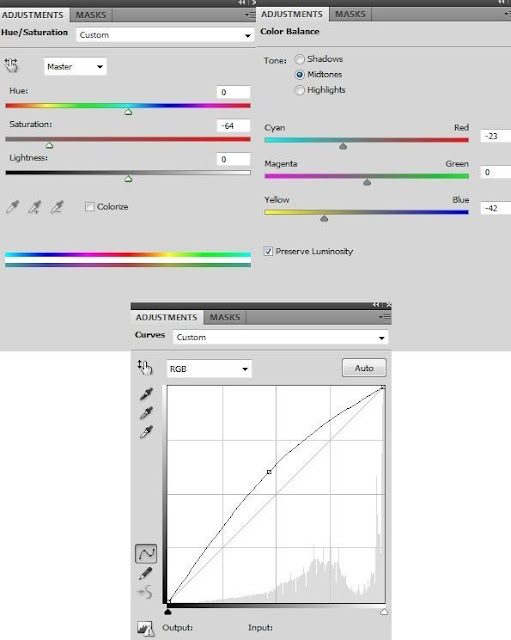
I use some adjustment layers (Hue/Saturation, Color Balance, Curves) with Clipping Mask for model to reduce saturation and brighten her:
Then I use soft black brush with opacity 100% and 20-30% to erase some parts on Curves layer mask. You can see how I did it on the mask and result on picture:
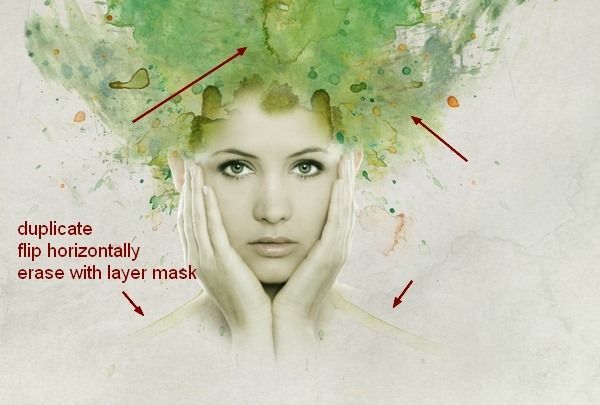
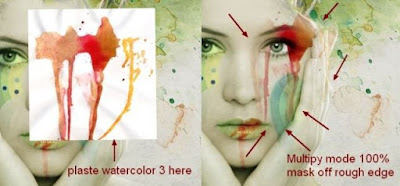
Drag watercolor 1 into top of our picture, place it under model layer. Convert it to Smart Objects and change the mode to Multiply 100% then remove some hard edges with layer mask:
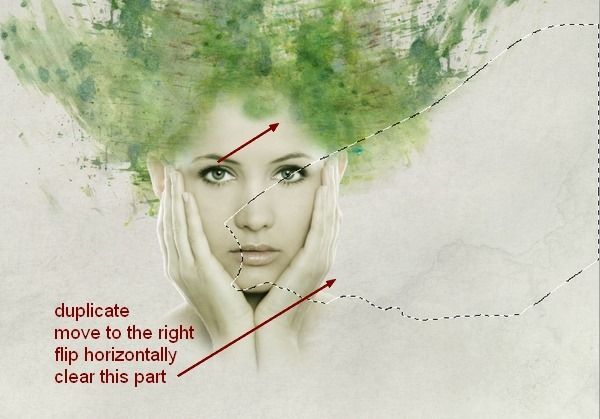
Duplicate this layer and move it to the right after flipping it horizontally. Use layer mask to create the look below:
Take watercolor 2 and set it under model layer then clear unwanted parts with layer mask:
Duplicate this layer and flip it horizontally. I use layer mask to remove some parts and now we have nice shoulder-like effect:
Step 8
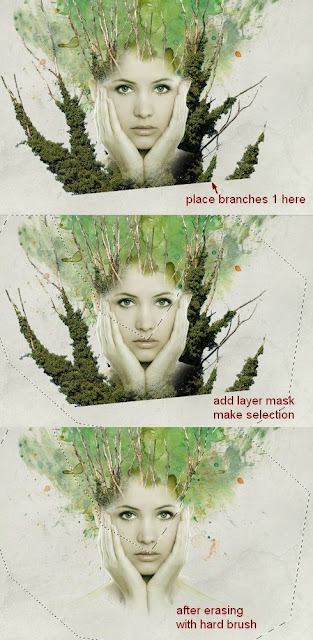
Isolate branches 1 and place it on the top of model head after converting it to Smart Objects and downsizing it (still under model layer). Add layer mask to this one and use Polygonal Lasso Tool (L) to make a selection at the edge of the branches then use hard black brush (don’t use soft brush) to remove the bottom and some branches as shown:
Isolate branches 1 and place it on the top of model head after converting it to Smart Objects and downsizing it (still under model layer). Add layer mask to this one and use Polygonal Lasso Tool (L) to make a selection at the edge of the branches then use hard black brush (don’t use soft brush) to remove the bottom and some branches as shown:
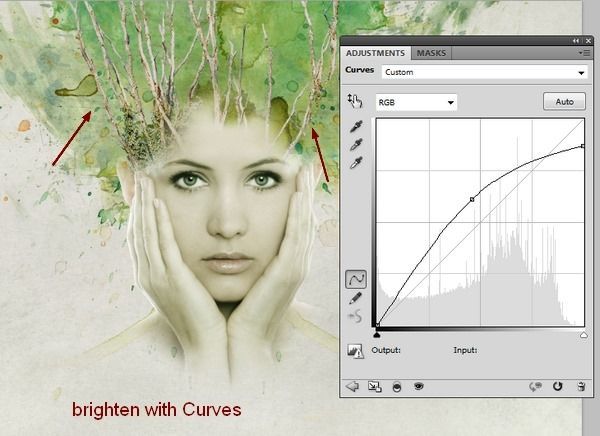
I add a Curves layer (Clipping Mask) to brighten the branches a bit:
Step 10
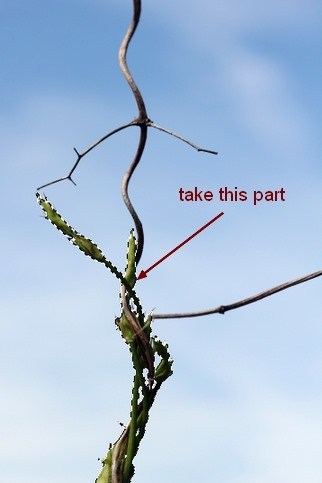
Open branches 2 stock. I take a part from this pic and situate it at the top right of model head, then duplicate it twice, name them from 1 to 3. I flip 2nd horizontally, then position them around model head part. I use layer mask to erase the bottom of the third:
These branches look darker from background so I want to brighten them together. To do it, make these layers selected then hit Cmd/Ctrl+G to make group for them. Change the mode of this group from Pass Through (default group mode) to Normal 100%. On 3 layer, go to Layer-New Adjustment Layer-Curves:
Because the mode changed to Normal 100% so this Curves layer only affects the layers inside this group (branches 2 ones).
Make a new layer on the top. Set foreground and background to #a8ba81 and #012955. Use Rectangular Marquee Tool to make a square on the pic then go to Filter-Render-Clouds. After applying Clouds filter, choose Filter-Pixelate-Mosaic:
Filter-Distort-Polar Coordinates:
Step 13
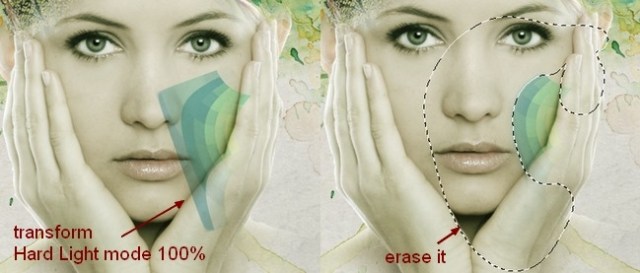
Convert this result to Smart Object then downsize it and change the mode to Hard Light 100%. Use Cmd/Ctrl+T to rotate it and move it to the right cheek of model and erase unwanted parts with layer mask:
Convert this result to Smart Object then downsize it and change the mode to Hard Light 100%. Use Cmd/Ctrl+T to rotate it and move it to the right cheek of model and erase unwanted parts with layer mask:
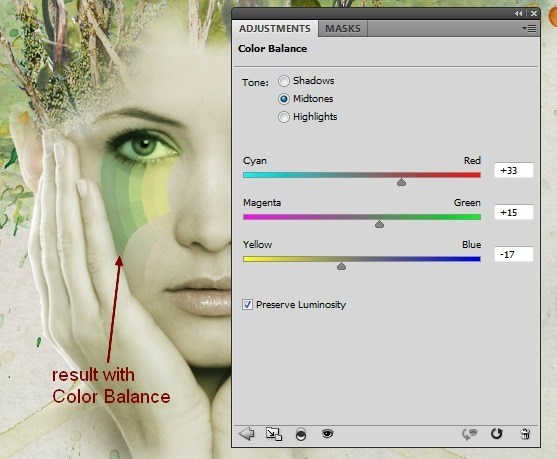
I use a Color Balance layer (Clipping Mask) to change color of this effect:
Make a new layer and use hard brush with color #012955 to make some dots under the left eye. Before spotting, press F5 to change settings for this brush:
Step 15
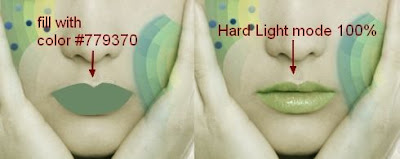
Create a new layer and make selection for the lips, fill it with color #779370 then change the mode to Hard Light 100%:
Create a new layer and make selection for the lips, fill it with color #779370 then change the mode to Hard Light 100%:
I name it “color lips”.
Step 16
I use a new layer, change brush to splatter ones and set foreground to #83192d. Take brush number 681 with size about 100 px to spot over the lips. Hold Cmd/Ctrl while clicking “color lips” layer to load it selection then click Add layer mask button. After it, change the mode to Overlay 100%:
I use a new layer, change brush to splatter ones and set foreground to #83192d. Take brush number 681 with size about 100 px to spot over the lips. Hold Cmd/Ctrl while clicking “color lips” layer to load it selection then click Add layer mask button. After it, change the mode to Overlay 100%:
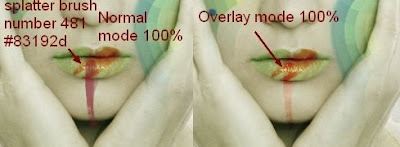
Make a new layer and use splatter brush, number 481 to spot on lips and chin, transform it and set the mode to Overlay 100%:
Take watercolor 3 and paste into the right eyes after rotating and resizing. Change the mode to Multiply 100% and use layer mask to get a faded effect:
Step 18
I use Curves and Color Balance layers (Clipping Mask) to change color of this watercolor effect:
Take watercolor 4 and paste into our picture and change the mode to Multiply 100%.

Add a Curves layer to this layer (Clipping Mask):
Step 21
Open watercolor 5 (pack). I choose this one to work with and move it above the top right of model head, warp it:
Change the mode to Multiply 100% and use layer mask to erase the part on model face:
Step 22
I use another watercolor image to add to the left of model head, set the mode to Multiply 100% and mask unwanted part:
I use another watercolor image to add to the left of model head, set the mode to Multiply 100% and mask unwanted part:
Step 23
I add another colorful watercolor texture to the left of model head, in a lower position, change the mode to Multiply 100% and hide unwanted parts with layer mask:
Step 24
Make group for this layer as done with branches 2 and change the mode of this group to Multiply 100%. I reduce saturation of them with a Hue/Saturation layer within this group:
Step 25
Open flowers stock. Use Move Tool to drag it onto model forehead. Then on a new layer under flowers one I use soft black brush with opacity about 40-50% to paint under flowers to make shadow for them:
Step 26
I change color of the flowers with a Hue/Saturation layer:
Step 27
Open halftone images pack. I choose one to position at the left of model head, change the mode to Soft Light 100% and hide some parts with layer mask:
I choose a colorful halftone image to situate at the middle of the flowers. I put the mode to Multiply 100% and erase its bottom:
Step 28
I use one from wire frames pack to put to the right of model head and set the mode to Soft Light 100%:
Step 29
Make a new layer on the top. I use soft brush with color #b4ad92 to brighten the top of model head and blend elements there together. Change the mode to Overlay 100%:
Open butterflies pack. I choose 3 from them to move into our picture, arrange them as shown below:
Make group for these butterflies and change the mode of this group to Normal 100%. Create a Curves layer within this group to brighten and alter color of butterflies a little:
Step 31
Create some adjustment layers on the top.
Gradient Map:
Set this Gradient Map layer to Soft Light mode 100%. Color Balance and Levels:
Final Results

![About [span]me[/span]](http://images.huffingtonpost.com/2016-05-24-1464106527-7011249-paper_inspiration.jpg)
